Small changes to the way you work in the VBA editor can save a surprising amount of effort. Set up a UserForm before adding controls, give yourself keyboard shortcuts for commenting code, and stop pressing F8 fifty times when a conditional watch could take you straight to the problem.
The bigger improvements come from making your work easier to troubleshoot. That means handling errors without hiding them, restoring Excel’s settings when something fails, and understanding where a complicated formula gets its information.
These are practical habits I use when developing Excel tools. Some take only a minute to put in place. Others, particularly cascading error handlers, deserve a little more explanation.
Key Takeaways
- Customize UserForms and editor commands once to reduce repetitive setup and interruptions.
- Use conditional watches and the Locals window to investigate specific execution states efficiently.
- Preserve error context and restore Excel’s settings through deliberate handling and cleanup.
- Choose VBA, Office Scripts, or LAMBDA according to the task and required platforms.
Table of Contents
- Build Better UserForms with Less Repeated Work
- Make the VBA Editor Less Interruptive
- Navigate VBA Code Without Losing Your Place
- Debug Smarter with Watches and the Locals Window
- Handle VBA Errors Without Hiding the Problem
- Cascade Errors Up the Call Stack
- Audit Complicated Formulas with RefTreeAnalyser
- Choose Between VBA, Office Scripts, and LAMBDA
- Keep Learning by Solving Real Excel Problems
Build Better UserForms with Less Repeated Work
Set the form’s appearance before adding controls
Before dragging anything onto an empty UserForm, change the properties you want new controls to inherit.
I usually start with the background color and font. A white background immediately makes a form look different from the standard gray dialog, and setting the font on the form saves changing it separately on every control.
- Select the empty UserForm.
- Set its BackColor.
- Choose the Font and font size.
- Then add labels, text boxes, and other controls.
For an exaggerated test, use Calibri at 24 points and add a label. The inherited font becomes rather obvious. The label also picks up the form’s background color.
Not every property carries through to every control. Command buttons, for example, can retain their familiar gray background, so check those separately. The point is to establish as much as possible on the empty form rather than tidy up dozens of controls afterward.
Make OK and Cancel work from the keyboard
An OK button should do more than have the right caption. Set its Default property to True so Enter can activate it.
For the Cancel button, set Cancel to True so Escape activates it. Put OK to the left of Cancel to follow the familiar Windows dialog arrangement.
There is a small trap when copying the OK button to create Cancel: the copied button keeps the original properties. Check both explicitly:
- OK: Default is True, Cancel is False.
- Cancel: Default is False, Cancel is True.
Do not leave both properties set to True on the same button. The editor will let you do it, but that does not make it a good idea.
Save reusable controls in the Toolbox
If most of your forms need the same pair of buttons, there is no reason to repeat all that formatting and property editing.
- Right-click the Toolbox’s tab area and add a new page.
- Rename the page to something useful, such as My Controls.
- Select the configured OK and Cancel buttons together.
- Drag the selection onto the new Toolbox page.
- Drag the saved group onto a form whenever you need it.
The saved group retains the configured properties, including Default and Cancel. Check them before saving the group, otherwise you have simply made the mistake easier to reuse.
New groups initially receive a generic name. Customize the entry with a meaningful caption and description, such as “OK and Cancel.” You can change its picture too, but a useful description is already a considerable improvement.
Make the VBA Editor Less Interruptive
Comment whole blocks at once
Typing an apostrophe at the start of each line is manageable for three lines of code. For twenty lines, it gets old rather quickly.
Display the Edit toolbar, select the lines, and use Comment Block. Use Uncomment Block to reverse it.
You can also make these commands keyboard-friendly by customizing the toolbar:
- Open the toolbar’s Customize dialog.
- While it remains open, right-click the Comment Block button.
- Put an ampersand before the C in its name:
&Comment Block. - Choose Image and Text so the caption appears.
- Repeat for Uncomment Block, using
&Uncomment Block.
With that configuration, Alt+C comments the selected block and Alt+U uncomments it. These are customized access keys, not shortcuts you should expect in an untouched editor.
When I am coding, my hands are generally on the keyboard. Removing a small mouse trip that happens repeatedly is well worth doing.
Turn off Auto Syntax Check, but require variable declarations
The default syntax warning is very good at interrupting an unfinished thought.
Suppose you start a statement, then move elsewhere to copy a long variable name. The editor displays a message telling you the statement is wrong. Yes, it is wrong. I have not finished typing it yet.
Go to Tools > Options and clear Auto Syntax Check. Invalid lines still turn red, so you retain the visual warning without dismissing a dialog every time you leave an incomplete statement.
While you are there, select Require Variable Declaration. This adds Option Explicit to new modules and makes undeclared variables a problem you must fix rather than an easy mistake to overlook.
Occasionally, the syntax message is helpful when you cannot spot the missing parenthesis or other small error. You can always turn it back on temporarily.
Choose the code view that suits the task
The Default to Full Module View setting controls whether a code window normally shows the whole module or one procedure at a time.
Procedure view is useful when you want to focus on a single routine. Full module view is more convenient when moving between declarations and several related procedures. Neither is compulsory. Use the one that makes the current job easier.
Navigate VBA Code Without Losing Your Place
Scrolling up to find a declaration is easy. Finding exactly where you came from is sometimes less easy.
Two navigation commands are particularly useful:
- Shift+F2: Go to the definition of the variable, constant, or procedure under the cursor.
- Ctrl+Shift+F2: Return to the previous position through Last Position.
You can also right-click an identifier and choose Definition. This becomes much more useful when the declaration is in another module, rather than two lines above the code you are reading.
Last Position is worth remembering, although it did not cooperate during my demonstration. Treat it as the editor’s navigation history command rather than assuming every arbitrary scroll or cursor movement will produce the return point you expect.
For a workbook used as a navigation index, another technique is to use HYPERLINK with a leading # for an internal target. My demonstration workbook combined procedure-name text and display text to provide clickable entries into the supporting examples. The destination and supporting setup matter here: an ordinary worksheet hyperlink is not, by itself, a general command to run a macro.
Debug Smarter with Watches and the Locals Window
Move the next execution point carefully
Press F8 to begin stepping through a procedure. In break mode, the yellow indicator identifies the next statement to execute.
You can move that indicator to another valid statement, including by dragging it in the margin. This lets you repeat a section or skip ahead while investigating a problem.
It is useful, but it is not magic. Moving the execution point does not recreate the state that normal execution would have produced. You may have skipped initialization or repeated an operation that changes the workbook. Use it deliberately.
Break when a condition becomes true
Suppose a loop fails when its counter reaches 20. You could step through every iteration. Or you could ask the debugger to stop at the interesting one.
- Right-click the counter and choose Add Watch.
- Make the expression a condition, such as
counter = 20, using the actual variable name. - Select Break When Value Is True.
- Press F5 to continue.
Execution pauses when the expression becomes True. This is rather more attractive than pressing F8 repeatedly, especially when the troublesome record is near row one million.
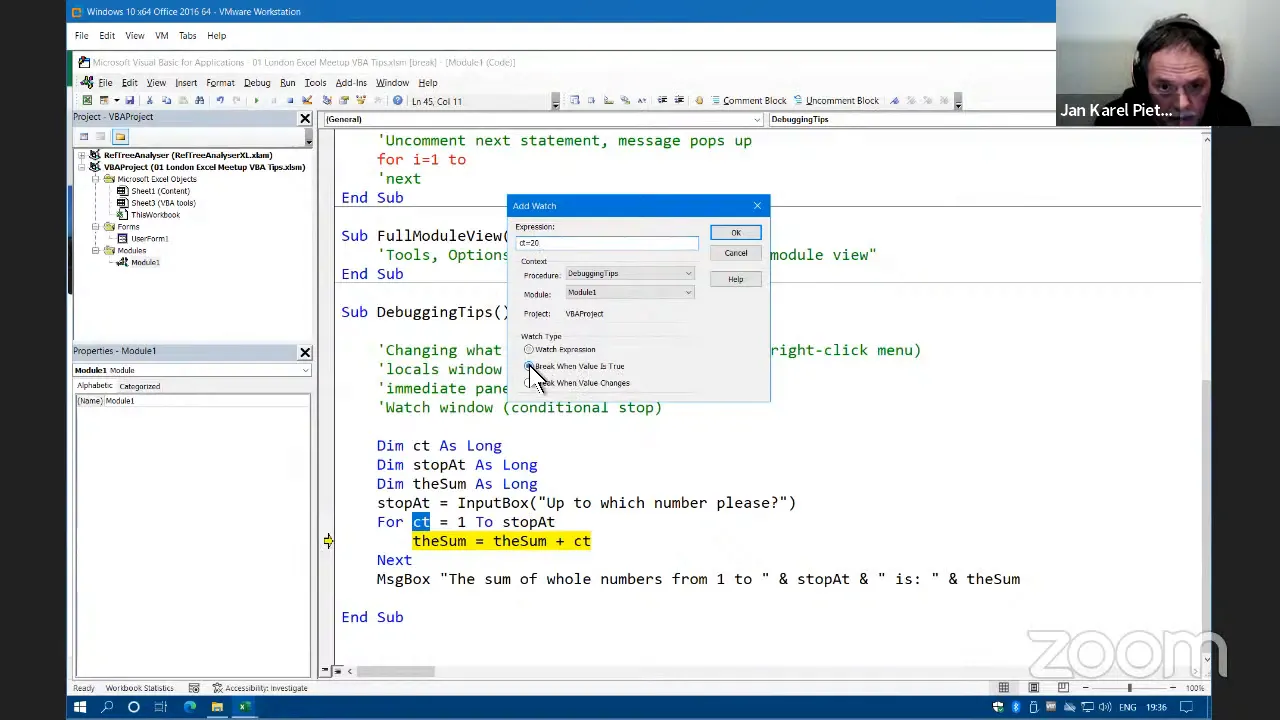
You can edit the expression in the Watch window. Change the target from 20 to 22, continue, and inspect the later iteration. The watch also remains available for subsequent runs while you continue debugging.
Inspect and edit local variables
The Locals window displays the current procedure’s local variables and their values. As you step through a loop, you can see the counter move and the running total change.
You can also edit variable values while execution is paused. That is handy for testing a particular state without restarting the entire procedure.
Be careful about what you infer from those edits. Changing a value midway through execution does not necessarily reproduce a normal run, and changing a variable associated with a loop is not a substitute for understanding when the loop evaluates its bounds. The Locals window is an investigative tool, not a reason to stop thinking about program state.
Handle VBA Errors Without Hiding the Problem
A simple division routine illustrates the choices. Ask for two numbers, divide one by the other, and sooner or later someone will enter zero as the divisor. Someone else will enter text.
You need to decide which problems to prevent, which expected failures to test for, and which unexpected failures to report.
Use On Error Resume Next for a narrow, expected failure
On Error Resume Next tells VBA to continue after a runtime error. Used broadly, it can leave the routine carrying on with invalid or incomplete results.
During the division demonstration, a result was displayed as “infinite” after errors were suppressed. That is not a sound basis for treating division by zero as a successful calculation. The important lesson is that continuing execution does not prove the operation succeeded.
There are sensible uses for temporary error suppression. For example, you might try to assign a worksheet to an object variable when you already know the sheet may not exist.
The pattern is to attempt that specific operation, inspect whether it failed, and make an explicit decision about what happens next. Do not let “ignore errors” become the policy for the entire procedure.
Prevent predictable errors through validation
Where practical, check the input before performing the operation:
- Was anything entered?
- Is the entry numeric?
- Is the divisor nonzero?
- Should the user receive a message and another opportunity to enter a value?
The VBA InputBox function accepts text, so a request for a number does not guarantee numeric input.
Validation can become complicated if every test is written inline. Put repeated checks into a small function rather than building an increasingly untidy main routine. Preventing an expected error is generally preferable to recovering from it afterward.
Catch unexpected errors with a labeled handler
Use On Error GoTo LogError, or another meaningful label, to direct execution to an error-handling section. A label is a name followed by a colon, such as LogError:.
The handler can report what happened using information from the Err object. Then it must leave the active error-handling state correctly.
The three forms of Resume have different purposes:
Resume: Retry the statement that caused the error.Resume Next: Continue with the statement immediately after the failing statement.Resume TidyUp: Continue at the specified cleanup label.
Retrying only makes sense if you have corrected the condition that caused the error. Skipping the failed statement only makes sense if subsequent code can safely proceed without its result.
Microsoft’s On Error documentation is a useful reference for the distinction between enabling a handler and actively handling an error.
Always provide a cleanup route
I make a habit of placing a tidy-up section immediately above the error-handling section. It gives the procedure a common place to release object references and restore application settings.
Typical cleanup includes:
- Releasing object variables where appropriate.
- Restoring the calculation setting.
- Restoring
Application.EnableEvents. - Undoing other temporary application changes.
If the error handler simply ends the procedure, Excel may be left in manual calculation mode or with events disabled. The error message may be gone, but the workbook is still not behaving properly. Cleanup is part of handling the error, not an optional extra.
Cascade Errors Up the Call Stack
Real projects rarely consist of one procedure. An entry procedure calls another routine, which calls a third. A useful error report should tell you not only what failed, but how execution reached it.
Consider this call sequence:
- An entry procedure calls
NextSub1. NextSub1callsNextSub2.NextSub2encounters a division-by-zero error.
Each procedure has its own error handler. The innermost handler collects the original error number and description, adds its procedure name, and raises an error again.
An error raised while a procedure’s error handler is active can pass to an enabled, inactive handler in a calling procedure. That is what allows the information to move up the call stack.
The next handler adds its own procedure name and raises the error again. Eventually, the entry procedure receives a description containing the route through the routines and the original failure.
In the example, the resulting report identifies the entry procedure, NextSub1, NextSub2, and the original error 11, division by zero.
Keep original errors distinct from forwarded errors
The demonstrated pattern uses a custom error number based on vbObjectError when forwarding the error. That constant provides a base for application-defined errors.
Because those custom numbers are negative in this pattern, the handlers use a negative-number test to distinguish information already packaged by an inner routine from the original runtime error.
That test is a convention within the example, not a universal rule that every negative error number must have come from your own handler. The important design is to preserve the original information and add context without repeatedly replacing it.
At the top level, you can display the report, write it to a text log, or ask the user to send the details for troubleshooting. A call path is considerably more helpful than a message that merely says something went wrong.
Keep variables at the lowest practical scope
The same principle of keeping things understandable applies to variable declarations. Prefer declaring a variable inside the Sub or Function that needs it.
Broader scope is appropriate when the information genuinely belongs to the wider project, such as a shared project constant or a connection setting read once. It should not be the default simply because the same variable name appears in several routines.
For more substantial guidance on Excel application development and error handling, I recommend Professional Excel Development by Rob Bovey, Dennis Wallentin, Stephen Bullen, and John Green. It is an older book, but much of the underlying VBA development advice remains relevant.
Audit Complicated Formulas with RefTreeAnalyser
VBA is only half the troubleshooting story. A workbook can contain a perfectly ordinary formula that becomes a nightmare to investigate because it refers to several sheets, distant cells, and awkwardly named tabs.
Where Excel’s tracing tools become cumbersome
Excel’s Trace Precedents command draws arrows to the cells used by a formula. References to another worksheet are collected behind a worksheet icon and a dashed arrow.
The less obvious step is to double-click the dashed line. Excel opens a Go To dialog listing the references.
That works, but long workbook names can push the useful sheet and cell information out of sight. Investigating five or six cross-sheet references becomes a series of clicks and horizontal scrolling.
That frustration is one of the reasons I built RefTreeAnalyser.
Navigate precedents while keeping the formula in context
RefTreeAnalyser’s precedents dialog lists the references used by the selected formula. Selecting an address highlights the corresponding part of the formula and takes the worksheet selection to the referenced area.
You can move through the list with the arrow keys, which makes inspecting several references much quicker.
- Press Escape to return to the formula cell where you started.
- Use Close if you want to remain at the reference you have reached.
There is also a dependents view for investigating the other direction: which formulas rely on the selected cell.
Visualize referenced ranges on the worksheet
The visual mode draws connected boxes on the sheet, including previews of referenced areas. Instead of interpreting an address alone, you can see the data range the formula uses.
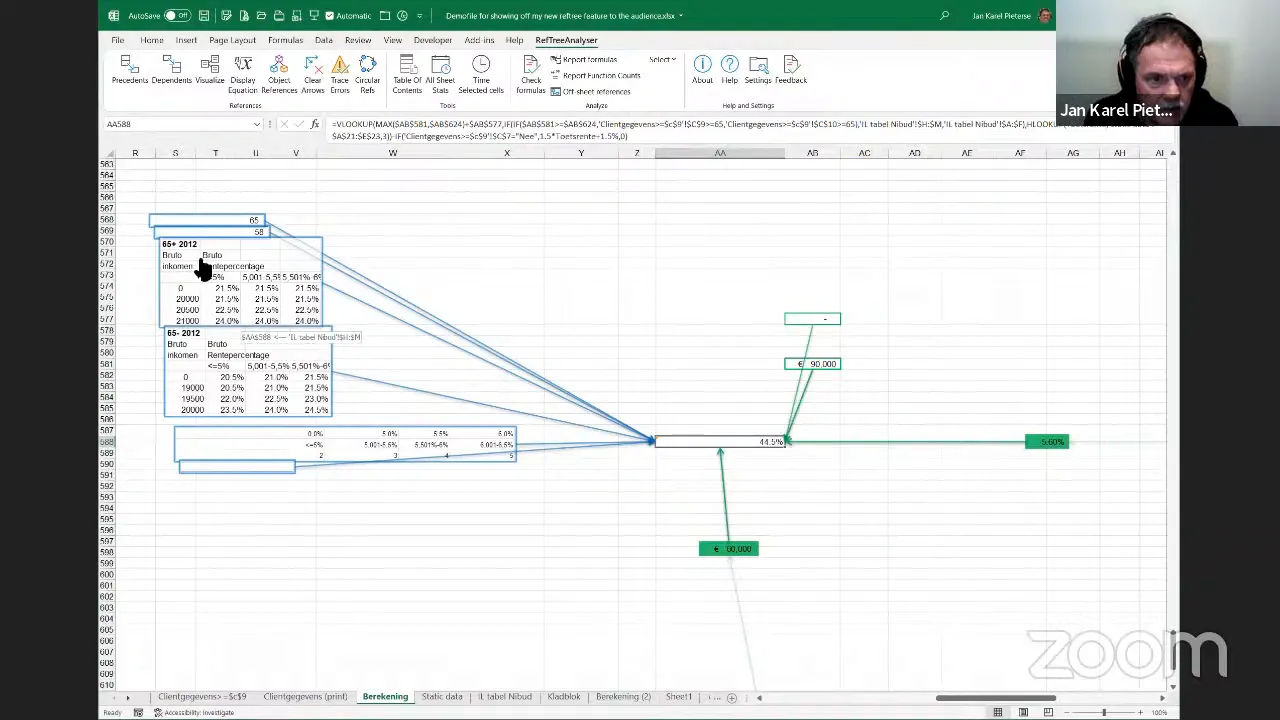
Click a preview to go to its source, then use the return link to get back to the formula being audited. References on the same sheet can also be represented, including cells outside the currently visible area.
This is particularly helpful when a formula mixes structured table references with ordinary cell references across multiple locations.
Inspect references stored in workbook objects
Not every important reference lives in a worksheet formula. Controls and other objects can point to cells, and a PivotTable may use an external source.
The Object References feature organizes workbook objects by worksheet and type, exposes their reference information, and brings the selected object into view.
That last part matters. Excel’s Selection Pane can list an object without scrolling to its location. If it sits well outside the visible range, knowing that it exists is only half the solution.
One example is a text box linked to cell B3 on a sheet named Pivot. The object’s displayed text depends on a cell, even though the reference is not sitting in the worksheet grid as an ordinary formula.
Find intertwined circular references
A circular-reference warning tells you that a calculation eventually refers back to itself. It does not necessarily make the complete chain obvious.
Excel provides information through the status bar and Formulas > Error Checking > Circular References. In the demonstration workbook, however, its built-in list did not expose the full set of separate, interconnected cycles.
RefTreeAnalyser identified three circles. Each involved four cells, and the circles shared parts of their paths.
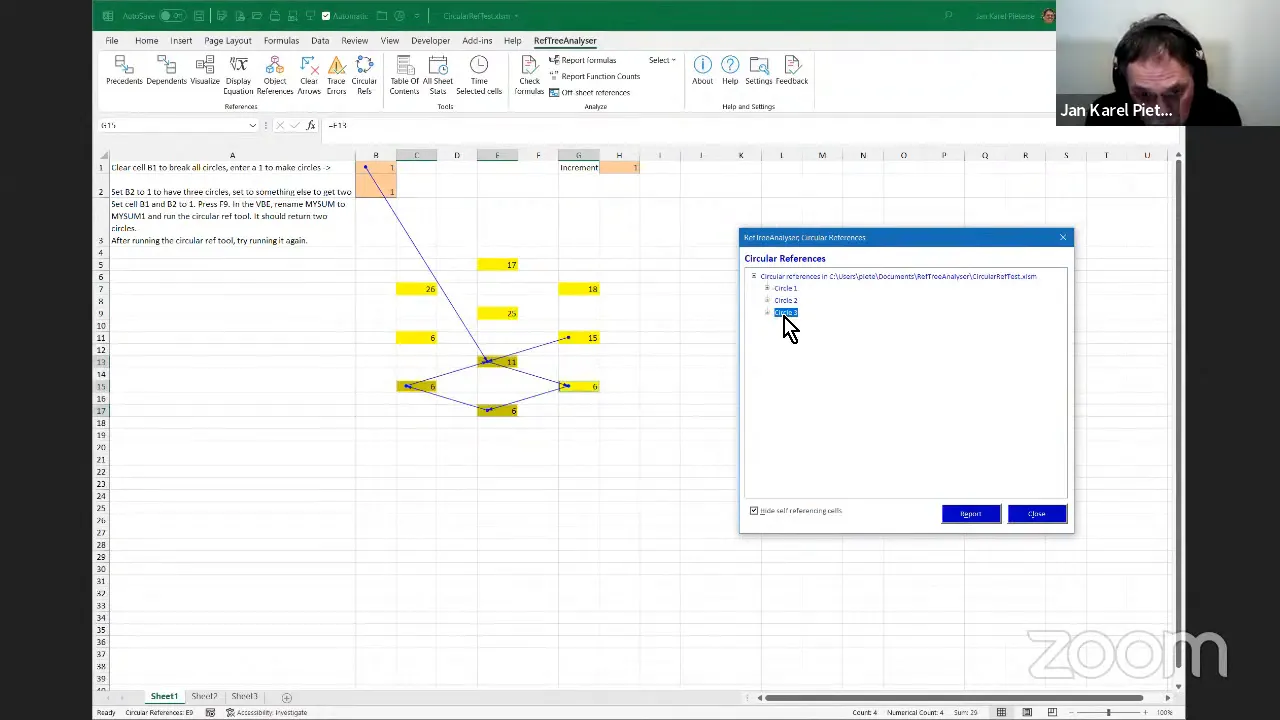
The distinction is important: finding one cell involved in a circular reference is not the same as understanding every circular path in the workbook.
The tool also includes other workbook utilities, such as adding a table of contents. And despite the assumption that these features must require special commercial development tools, nearly all my tools are written in straightforward VBA.
If navigating complex formulas, object links, or circular references is a regular part of your work, RefTreeAnalyser is designed to make those investigations less laborious.
Choose Between VBA, Office Scripts, and LAMBDA
VBA is useful, but it is not the answer to every platform
The question of whether VBA is about to disappear returns remarkably often. My view is that the enormous amount of existing business automation makes an imminent removal unlikely. That is an opinion, not a Microsoft retirement timetable.
The more immediate issue is where your workbook needs to run. VBA does not run in Excel for the web. If colleagues work primarily in the browser or access workbooks through an online collaboration environment, VBA cannot provide the automation there.
For someone starting with routine spreadsheet automation in a Microsoft 365 corporate environment, I would seriously consider Office Scripts first. For an existing desktop VBA application, the decision is different.
Use the Office Scripts recorder to learn Excel’s API
Office Scripts uses TypeScript, which builds on JavaScript. General language help is plentiful. The less familiar part is learning how the scripting API addresses Excel’s objects.
The recorder helps bridge that gap. Record actions, inspect the generated script, and use it to learn the syntax for working with cells, formatting, PivotTables, and charts.
My early experiments were encouraging, particularly for everyday workbook tasks. That does not mean Office Scripts and VBA are interchangeable.
For a practical starting point, use my Office Scripts basics and Office Scripts examples. Microsoft’s Office Scripts overview provides supporting platform documentation.
Distinguish Office Scripts from Office JavaScript add-ins
One question concerns event handlers, such as responding when a cell changes. Office JavaScript add-ins and Office Scripts are different development environments, even though both involve the JavaScript ecosystem.
The availability of an event in an add-in API does not mean you can use it in the Office Scripts editor. Developing an Office add-in also involves more setup than recording and editing a script.
Choose the environment based on the behavior you need, not simply the language name.
Combine Office Scripts with Power Automate
A particularly useful possibility is calling an Office Script from a Power Automate flow.
For example, a script that adds a table of contents to one workbook can become part of a flow that processes workbooks in a SharePoint folder. The job changes from repeating an action in individual files to applying a consistent operation across a collection.
The temptation is then to process every workbook you can find. Your administrator may have a different opinion. The practical lesson is the combination of workbook automation and a broader workflow, not an invitation to launch an enormous uncontrolled batch.
Consider LAMBDA before writing a VBA worksheet function
If your goal is a reusable calculation rather than an automation procedure, look at LAMBDA.
LAMBDA lets you define a custom function using Excel’s formula language. It can offer performance and portability advantages over a VBA user-defined function, particularly when the workbook must work in Excel for the web or on mobile devices as well as the desktop.
One example discussed was a rolling forecast function. Give it the actuals and the required number of forecast periods, then reuse the same calculation across different datasets. Write the logic once rather than rebuilding it everywhere.
A named LAMBDA can also travel to another workbook when you copy a cell that uses it. That provides a convenient way to transfer a reusable function without starting again in Name Manager.
The useful question is not “Which technology wins?” It is “Am I automating a workbook task, responding to application behavior, or defining a calculation?” Those are different jobs.
Keep Learning by Solving Real Excel Problems
Practical challenges are a good complement to formal training. The Financial Modeling World Cup, introduced in 2020, combines timed cases, published rankings, practice opportunities, and a community of people who enjoy solving spreadsheet problems.
Its financial modeling contests were described as monthly, two-hour events covering different finance topics. The separate Excel esports format focuses on Excel problem-solving without necessarily requiring finance knowledge.
A bowling-scoring challenge gives a good idea of the difference time pressure makes: calculate scores for 100 games in ten minutes. With a couple of hours, you might gradually assemble a solution. With ten minutes, efficient formulas, feature knowledge, and keyboard shortcuts suddenly matter a great deal.
The February 2022 Global Excel Summit brought this approach into expert battles involving eight competitors across two sessions. Its wider program combined more than 20 main-stage sessions, panels, networking, demonstrations, and six separately priced masterclasses, with recordings available to ticket holders.
The lasting value of events like these, and communities such as the London Excel Meetup, is the opportunity to compare approaches and learn from real problems.
You do not need to become a competitive modeler to benefit. Start with one improvement: save a reusable control group, add a conditional watch, give a procedure a proper cleanup path, or trace a formula beyond its first reference. Small changes become useful habits when you apply them to the work already in front of you.


