A long bulleted list can take up two pages while leaving a great deal of blank space on the right. Formatting that list into two columns can make much better use of the page, without changing the layout of the text above or below it.
The trick is to select the content first. Word can then apply columns to just that part of the document and insert the section breaks needed to keep the surrounding content separate.
I’ll use a VBA course outline as an example. It starts as a two-page document, but with a couple of lists arranged into columns, it fits neatly onto one page. The same technique is useful for newsletters, leaflets, booklets and brochures.
Apply Two Columns to Selected Text
Start with the paragraphs you want to arrange side by side. Leave any headings or introductory text that should remain full width outside your selection.
- Highlight the paragraphs you want to format into columns.
- Click the Layout tab.
- In the Page Setup group, click Columns.
- Choose Two.
I’m using Word 2016, where the tab is called Layout. In some older versions, it is called Page Layout.
If you are selecting a bulleted list, select the paragraph text rather than clicking or dragging directly on the bullet symbols. The bullets are paragraph formatting, so concentrate on selecting the content you want to change.
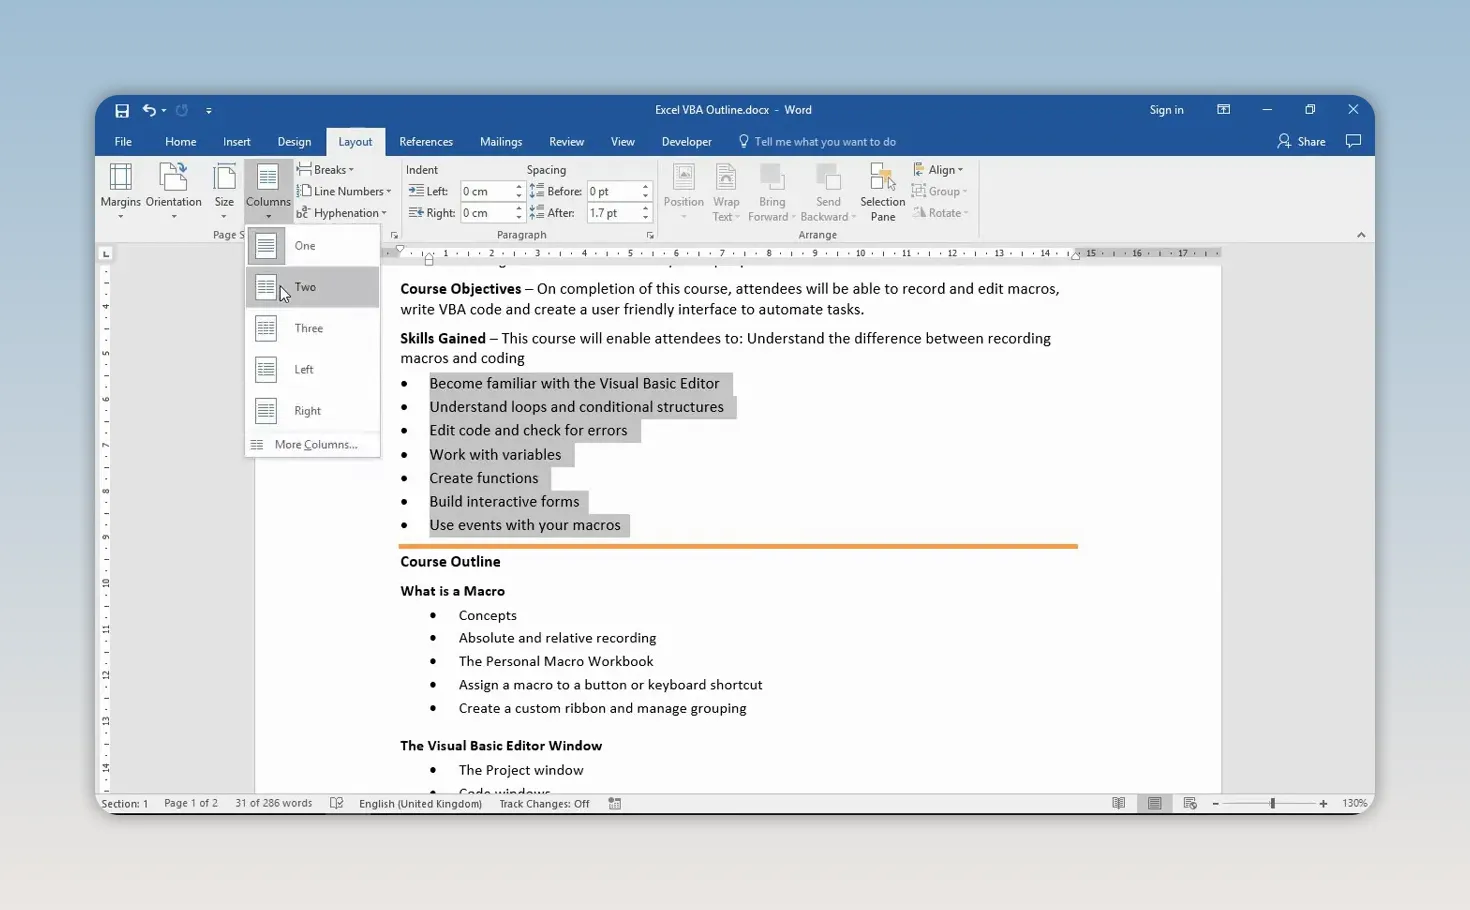
The Columns menu also includes one-column and three-column layouts, along with presets that use different column widths. For this outline, two equal columns do the job nicely.
Once you choose Two, Word rearranges the selected paragraphs into columns in the middle of the page. The text outside the selection stays in its existing layout. That’s the basic job done.
Understand the Continuous Section Breaks Word Adds
Although applying the columns takes only a few clicks, Word does something important behind the scenes: it inserts continuous section breaks before and after the selected content.
Sections allow different parts of a document to have different page formatting. Without that separation, a layout change could affect more of the document than you intended. Columns are one example, but sections are also useful when working with margins, page orientation, headers and footers.
A continuous section break lets the new section begin on the same page. That is what makes it possible to have full-width text, followed by two columns, followed by full-width text again.
Show the section breaks
- Click the Home tab.
- Click the Show/Hide ¶ button in the Paragraph group.
- Look for the section-break markers around your column-formatted text.
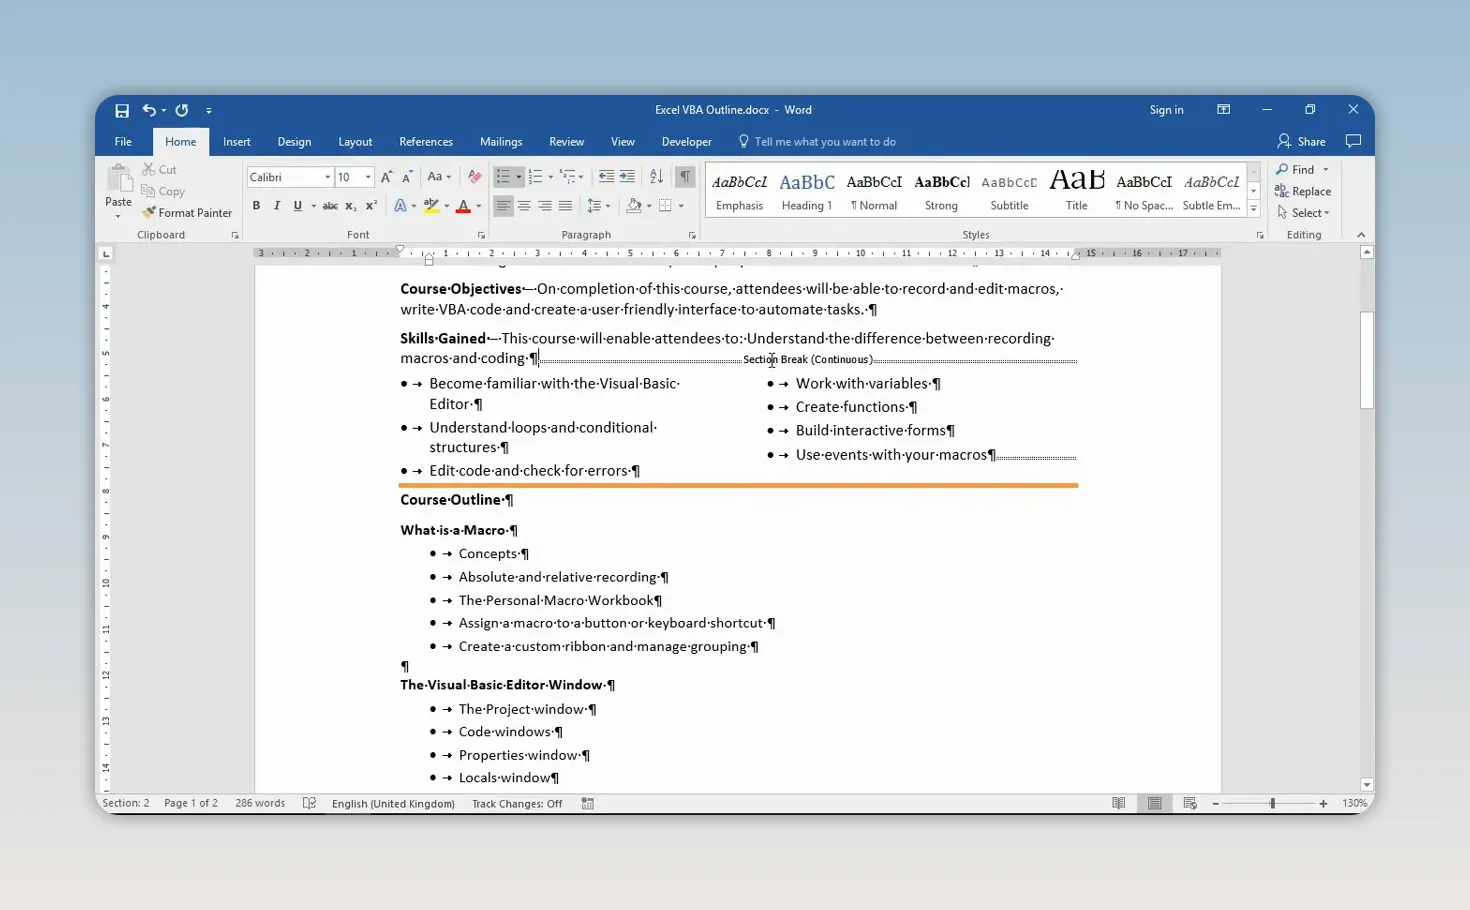
You can click Show/Hide again when you no longer need to see the formatting marks. Hiding the breaks does not remove them.
Do not delete those section breaks simply to tidy the screen. Removing them can remove or alter the column layout because they keep that formatting separate from the surrounding text.
When you select existing content first, Word takes care of this separation for you. If you are setting up sections before adding the content, you may need to insert the section breaks yourself. Microsoft’s guide to inserting a section break provides more detail.
Format Another Part of the Document
You can repeat the same process for another block of content without changing the first one.
In the course outline, I first apply two columns to the shorter list of skills near the top. I then select the larger list of course topics, beginning with “What Is a Macro,” and choose Layout > Columns > Two again.
This brings the example down from two pages to one, making use of the space that was previously empty on the right.
Your results will depend on the amount of text and the length of each paragraph. A list of short points may sit very neatly in two columns, while longer paragraphs can wrap differently and produce a less balanced result. Applying the columns is the starting point; the next step is checking where the content flows.
Insert a Column Break to Control the Flow
Word automatically flows text from the first column into the second. That is useful, but the automatic starting point is not always the most logical one.
For example, the “Interactive Code” heading in the outline initially sits near the bottom of the first column. It would be easier to read if that topic began at the top of the second column instead.
To force a heading or paragraph into the next column:
- Click immediately before the heading or paragraph you want to move.
- Open the Layout tab.
- Click Breaks.
- Choose Column.
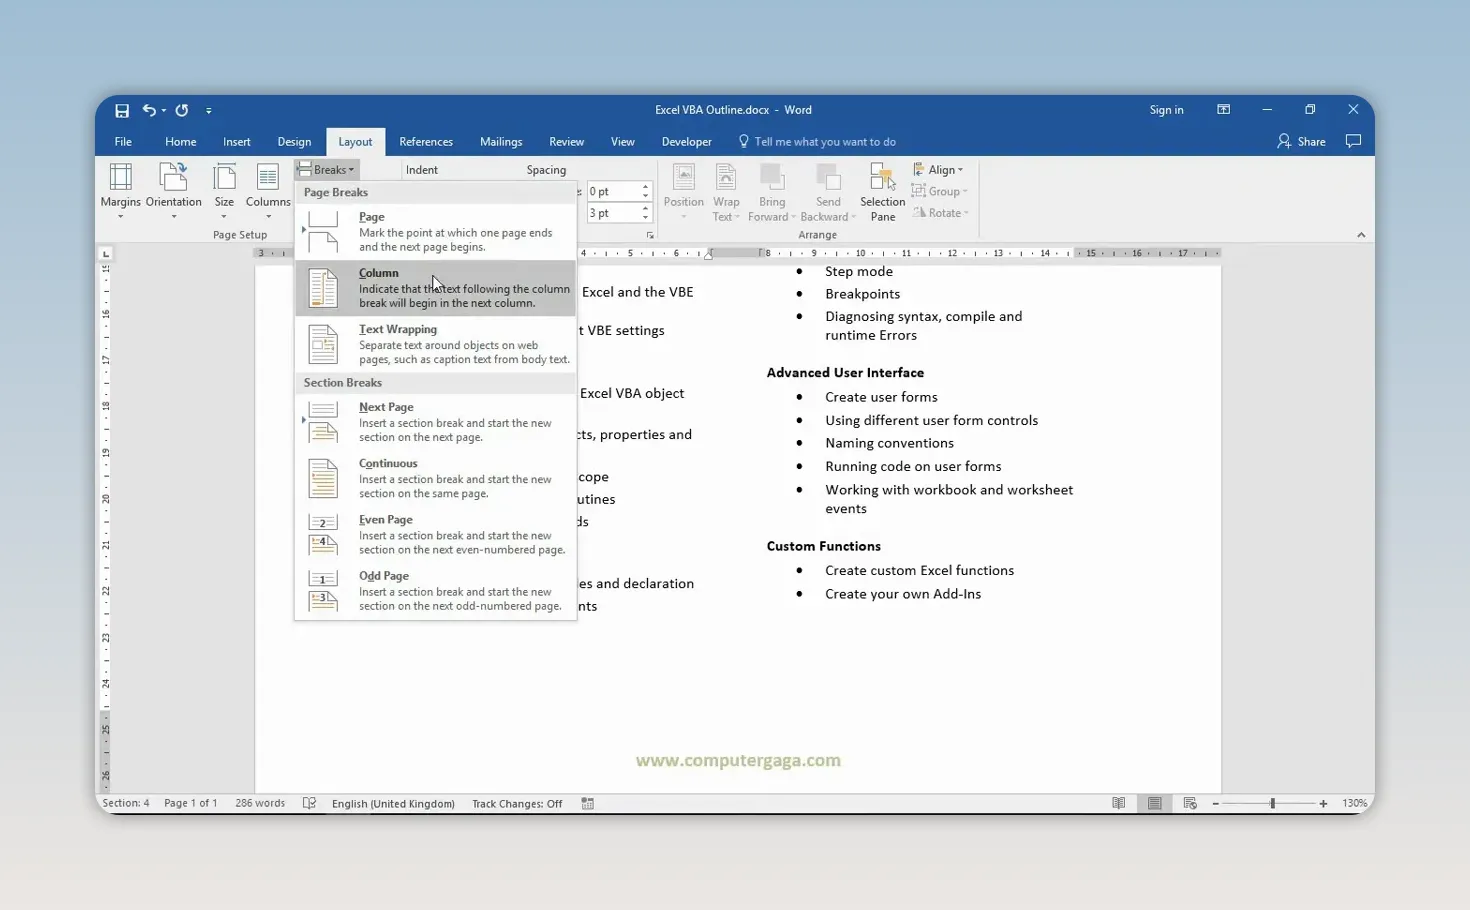
A column break works much like a page break, except it moves the following content to the next column rather than the next page.
After inserting it, check the overall layout. Starting a topic at the top of the next column may make the document clearer, but it can also leave a larger gap at the bottom of the first column. That may be a worthwhile trade-off. The aim is a sensible reading order, not simply two columns of identical height.
Adjust Column Width, Spacing and the Dividing Line
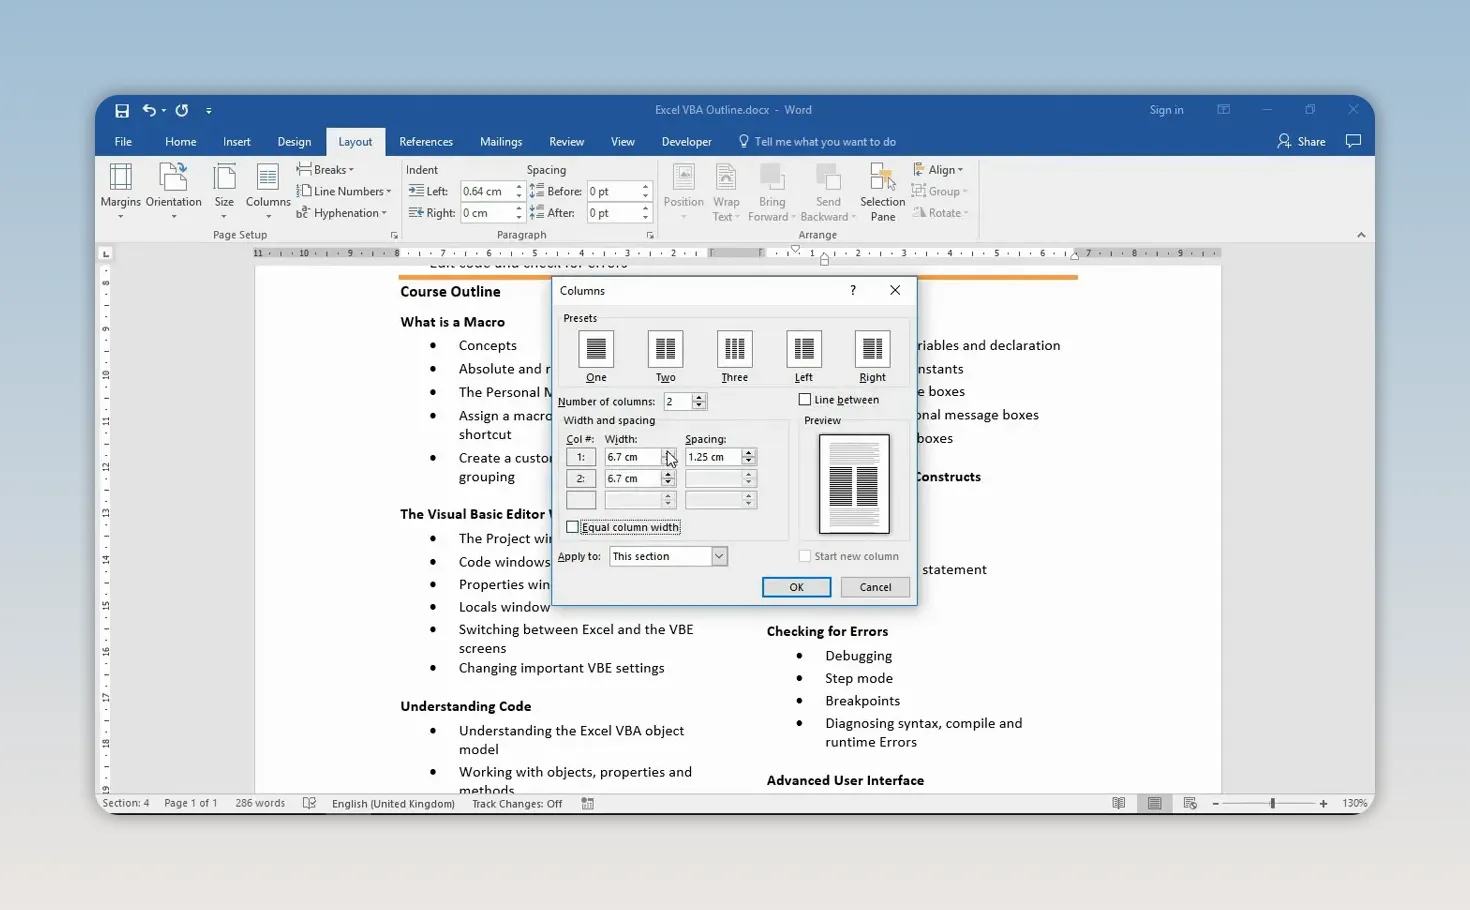
For more control, click inside the column-formatted section and choose Layout > Columns > More Columns.
This opens the Columns dialog box, where you can fine-tune the layout.
Add a line between columns
Select Line between to add a vertical dividing line. This can give the columns a clearer visual separation. In a suitable leaflet or booklet layout, it may also provide a visible guide for folding or cutting.
Use unequal column widths
Clear Equal column width if you want to adjust each column individually. As you increase one column’s width, Word adjusts the available space for the other.
Equal widths are not always the best choice. One column might contain pictures or a table that needs more room. Alternatively, a narrow column could serve as a sidebar for adverts or secondary information beside the main content.
Change the space between columns
Adjust the Spacing value to change the gap between the columns. If the gap looks too wide, you can reduce it; if the content needs more separation, increase it.
For this course outline, the default equal-width layout is already suitable, so I leave those settings unchanged.
Columns or a Borderless Table?
Columns are not the only way to put content side by side in Word. A two-column table with its borders turned off can be easier to control when you want separate blocks of information. You can adjust widths and add rows or columns to organise the content.
The important difference is text flow:
- Use columns when you want text to continue naturally from one column into the next, as it does in a newsletter or brochure.
- Use a borderless table when you want content held in separate side-by-side cells with a more fixed arrangement.
A table’s rigid structure can be its strength, but it does not provide the same automatic flow between columns. When that flow matters, Word’s column feature is the better fit.
For a compact course outline, selecting the right paragraphs and applying two columns may be all you need. Keep the section breaks in place, add a column break where it improves the reading order, and adjust widths or spacing only when the content calls for it.


